
Forget this thread and the proof-of-concept level version 1.x.
Climatic Biomes 2 is out!


2
The spawn offset changes the start place for the spawn search. Normally it is 0,0. From there GC searches outward in a square spiral until it finds a valid start location (which is basically "above the water level"). The spawn search is not limited and continues until there is a memory problem.
The spawn should end up in the nearest acceptable spot to the start point, although it can miss locations. If you have a Z offset of +5000 you should end up on the nearest decent-size landmass to 0,5000.
12
Geographicraft (Climate Control for 1.8 and later) 0.8.9b released. Serverside crash in 1.12 fixed.
1.12 version:
GeographiCraft-1.12-0.8.9b (runs standalone; does not need ZenoTechnology)
1.9.4 - 1.11.2 version
GeographiCraft-1.9-1.11-0.8.9 (runs standalone; does not need ZenoTechnology)
BoP biomes only work in the BoP or RTG worldtypes.
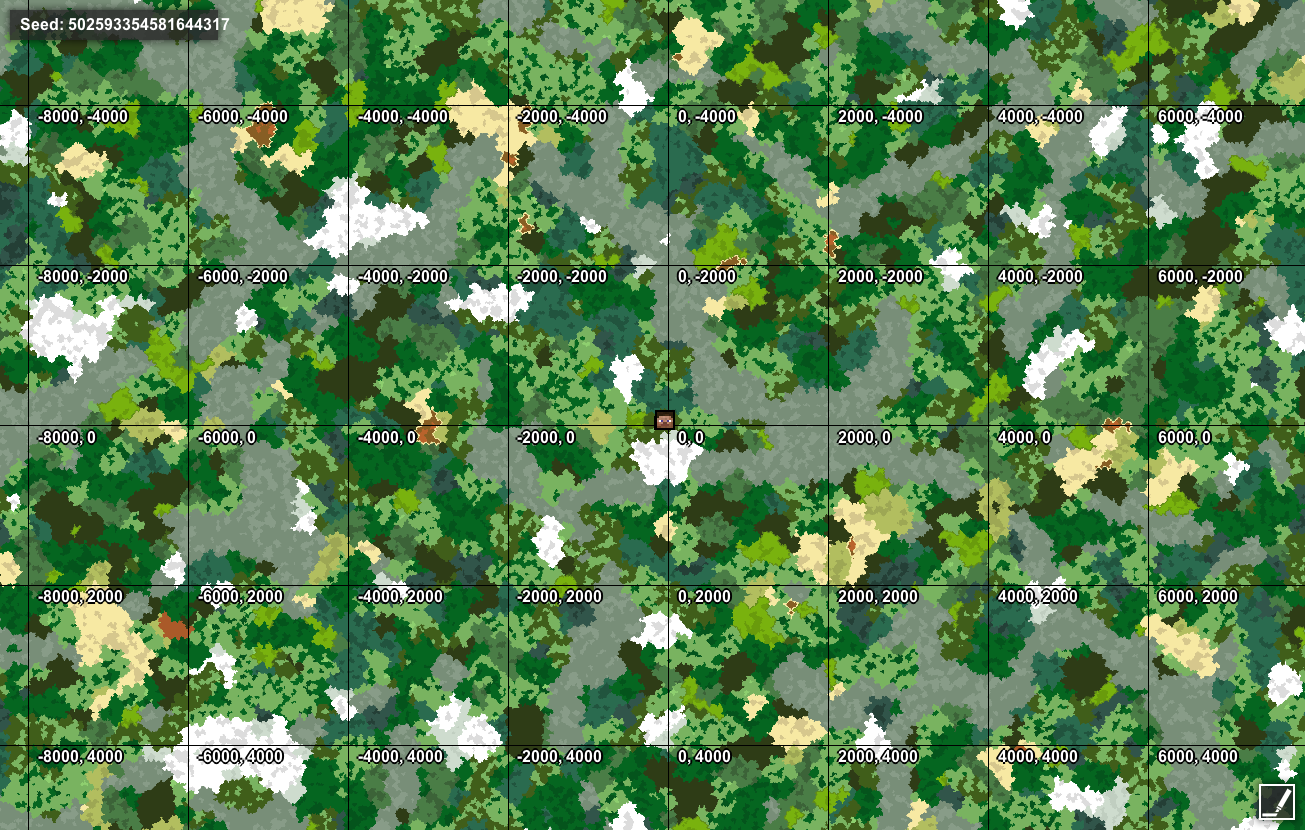
The maps below are done with
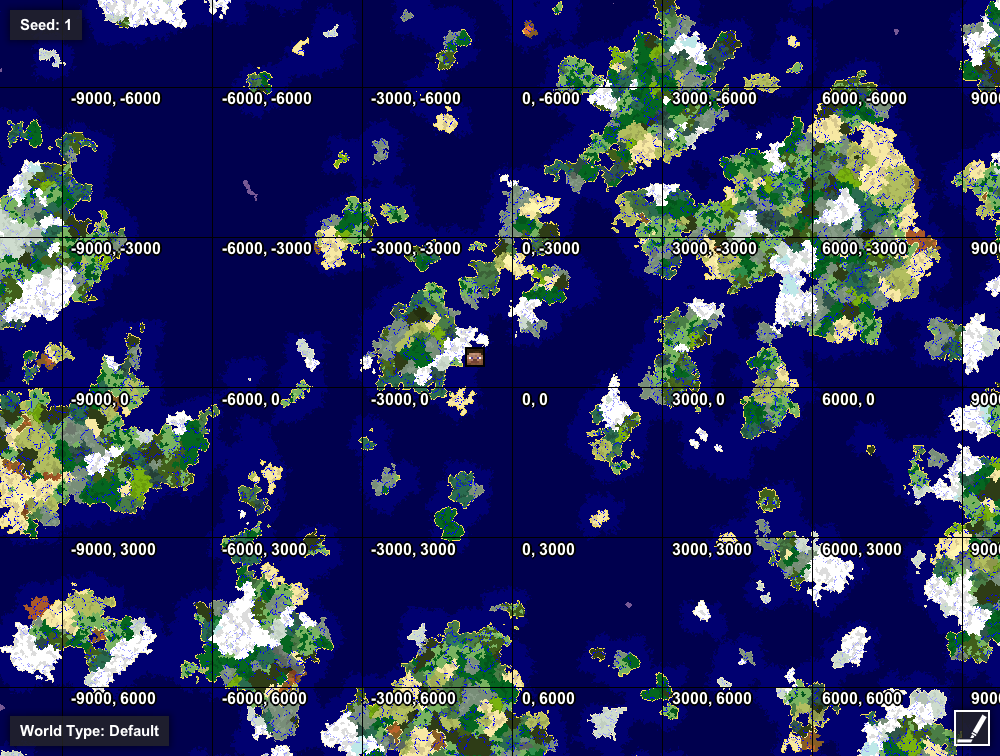
Map showing multiple islands and a variety of climates in a 16Kx20K area around start, with default settings and SeparateLandmasses=true (oceanic world)

Same seed and settings but with SeparateLandmasses=false (continental world)
Mountain chains! Mountains can now be set to appear mostly in mountain chains. A great option to add interest to large land areas.
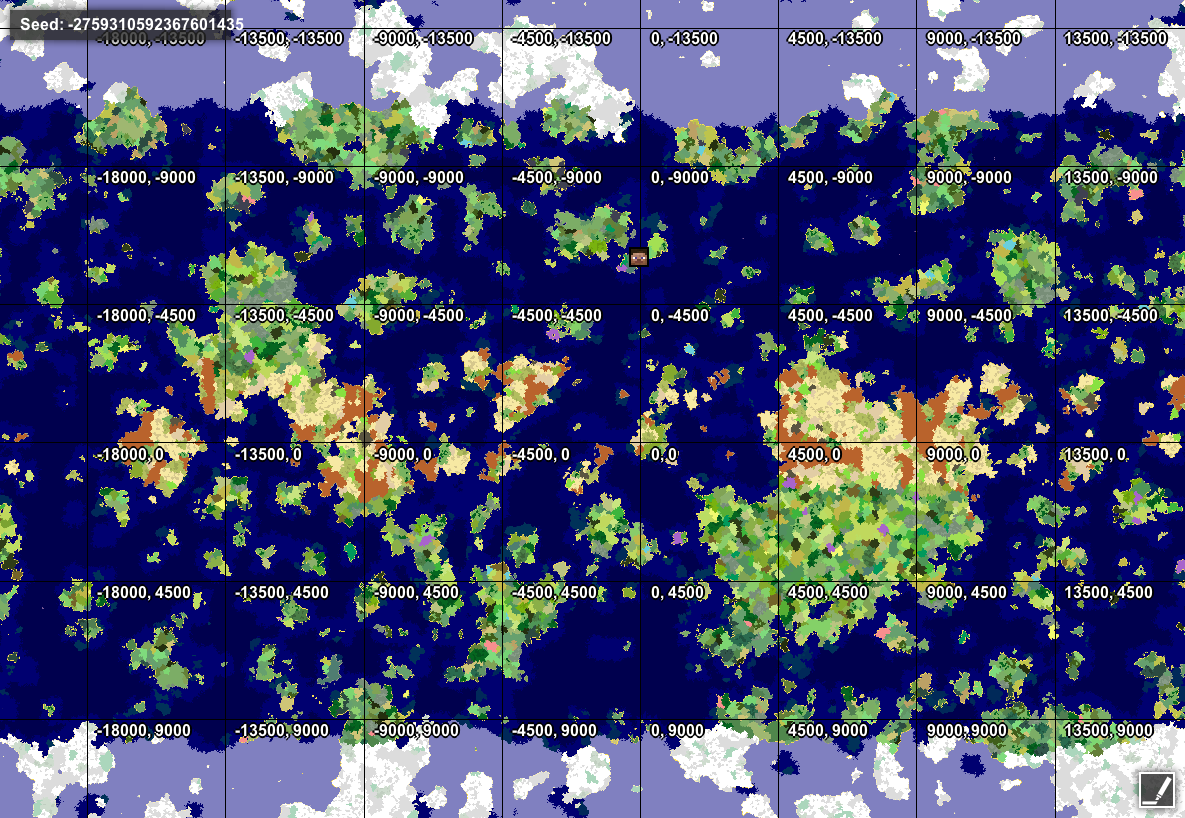
Latitudinal climates with Frozen Oceans option. Note use of start location option to place the hot zone at the equator but the spawn in a temperate area.
Current supported outside mods are RTG, Biomes o' Plenty, Highlands, and Thaumcraft.
Biomes o' Plenty and Highlands have both made changes that restrict usage. BoP will only place decorations in the BoP and RTG worldtypes; GC can place BoP biomes in the overworld but they have nothing in them. Highlands has tuned its terrain generators to its own noise generators, available only in its worldtype. Highlands biomes can be placed in other worldtypes such as Default and BoP but they look very different from the intent, generally having an "amplified" feel.
As a result, the defaults for intervening in BoP and Highlands worldtypes have been changed to "true".
Defaults for climate incidences have been changes to 1/1/1/1 from 2/1/1/2. Generally 1/1/1/1 is better for oceanic worlds and 2/1/1/2 for continental ones. Feel free to change to suit your taste, of course.
Geographicraft allows you to control climate zones, ocean sizes, biome frequencies, and continent sizes. Make Minecraft worlds into Yourcraft worlds! Geographicraft is a 1.8 version of Climate Control, renamed to make the function clearer
Set climate zones to smaller, more manageable sizes so you can find a variety of biomes more easily.
Change the frequencies of common biomes and climate zones to occur as often or as rarely as you want.
Prevent hot biome-cold biome transitions, or mix all the biomes together.
Restore true oceans to vanilla, or keep a universal continent with large lakes.
Create a variety of land sizes, from giant continents tens of thousands of blocks across to islands that fit on a single map.
Move biomes from one climate zone to another. Turn the oceans into giant deserts, endless jungle, frozen ice plains, or vast mountain ranges, if you want. Fill the oceans with islands of your choosing. Rearrange temperate zones to make warm and cool zones distinctive. Put mountains or forests into hot zones as oases.
Review of the 1.7 predecessor, Climate Control, by TeronRedoran
Also removes the tiny islands out in the ocean.
Download
GeographiCraft-1.8.9-0.7
requires ZenoTechnology-1.2 to run
For Climate Control users: the config files have been renamed but the content is the same.
Version info and changelog:
How the world-specific configs work.
GeographiCraft uses configs differently from the standard Forge model. It keeps a separate config for each world, and uses the "standard" config file only for new and imported worlds, and only to create their world specific configs.
The important configs are stored in the worldspecificconfig folder in each world's save directory. This file holds the settings for that world. Changing the config file for a different world or the general config file in the general config folder will have no effect whatsoever on a world with it own worldspecificconfig. You can have as many different worlds as you want, each with its own settings, and switch back and forth between them without any config fiddling. The only exception is biome sets; the assignment of IDs to biomes is set by the biome mods you have, not by CC. You can use CC to make some biome not appear in any given world, however.
The general config is used for new worlds, and for worlds that are being switched to GeographiCraft. When the world is first run under CC, the current general config is effectively copied to the worldspecificconfig folder. That then becomes that world's config and can be edited to change that world's settings without changing other worlds or any new or imported worlds.
Chunk Wall prevention
Effects of config settings on world (long)
The defaults create a world with a wide variety of land structures, from oceans scattered with islands to massive continents. Climate zones still exist, but are smaller than in vanilla, roughly the size of snowy zones in vanilla 1.6 and before.
Mod Pack Policy: You may include this mod in a modpack provided: 1) You provide attribution; 2) You provide a link to this thread, the Planet Minecraft post, or the Curse download page; and 3) You do not use the modpack for any financial gain, including AdFly links and the like.

2
Dooglamoo Worlds mod: natural terrain and ore generation.
Features:
package com.dooglamoo.api;

import net.minecraft.block.state.IBlockState;
import net.minecraft.world.gen.feature.WorldGenerator;

public interface DooglamooWorldsApi
{
 public void registerBlock(String key, IBlockState state);

 public void registerGenerator(String key, WorldGenerator gen);
}DooglamooWorldsApi api;<br>try {<br> Class<!--? extends DooglamooWorldsApi--> c = Class.forName("com.dooglamoo.worlds.common.Api").asSubclass(DooglamooWorldsApi.class);<br> api = c.newInstance();<br>} catch (Exception e) { }The file names of your blocks/features json files should match the key name you used to register your blocks and feature generators with the API.

1
Well... you could have one call the other. I don't think it would cause any looping or anything terrible.
public EnumActionResult onItemUse(ItemStack itemStackIn, EntityPlayer playerIn, World worldIn, BlockPos pos, EnumHand hand, EnumFacing facing, float hitX, float hitY, float hitZ)
{
	this.onItemRightClick(itemStackIn, worldIn, playerIn, hand);
	return super.onItemUse(itemStackIn, playerIn, worldIn, pos, hand, facing, hitX, hitY, hitZ);
}
1
The Item class has a method for getting the player's look vector. Call this from onItemRightClick before returning an ActionResult.
RayTraceResult rtr = this.rayTrace(worldIn, player, true);
Then check that it hit a block like this:
if (rtr == null)
{
    return ActionResult.newActionResult(EnumActionResult.FAIL, itemStackIn);
}
else if(rtr.typeOfHit == RayTraceResult.Type.BLOCK)
{
    BlockPos hitPos = rtr.getBlockPos();
    // other stuff
}
I do not know if this works flawlessly for blocks that do not have a selection box -- specifically air, fire, etc. In your case, detecting clicking on fire is very important. You may want to set hitPos to rtr.getBlockPos().offset(rtr.sideHit, 1) and see how that works.

8
Handling Packets in 1.7.x and up - Making the SimpleNetworkWrapper Not So Simple
Note about terminology: I will be using the terms 'packet' and 'message' interchangeably in this tutorial.
Today, I will show you how to make a 'convenient-and-annoyance-free-but-possibly-too-complicated' version of the SimpleNetworkWrapper. If you prefer a simple solution, please see this tutorial by diesieben07 - he'll have you up and running with packets in no time. You should check out that tutorial anyway if you are going to follow along, as it provides an excellent explanation of everything you need to know about the SimpleNetworkWrapper.
IMPORTANT: The solutions presented in this tutorial are wholly unnecessary for a functioning packet handling system - they are purely stylistic. Take this tutorial with a grain of salt - it's one of those projects that was more a 'can I do this?' than 'should I do this?', and since I did it, I figured heck, maybe someone else will get a kick out of this.
Now, why would anyone want to do something different when it's so simple? Well, there were a couple points about the process that annoyed me (in comparison to the good old days when everything was better :P) and I wanted to fix:
1. There isn't an EntityPlayer passed directly to the onMessage method - when nearly every packet sent is going to want to reference either a player or world object, this seemed like a huge oversight and inconvenience to me, even though it CAN be retrieved (and stored) in one line, why should we have to do that when it can just be passed as a parameter like it always has been?
2. There is no indication of which side you are on when handling the message - you must either remember to which side you registered it, go check, or check the MessageContext#side field, all of which seem kind of lame, whereas before, at least the way I had it set up, the side you were on was embedded in the name of the handling method. Clear, concise, no chance of getting confused and using Minecraft.getMinecraft() for something when on the server. It was awesome.
3. Registering requires a byte discriminator - wait, what? Why couldn't it just automatically increment each time a message is registered, since they are all registered per mod (i.e. everyone gets to start at 0) ? What a useless parameter to provide, and boy, is that sure annoying.
Ok... so maybe those points aren't that convincing to you, and they really aren't that big of a deal. If you find that's the case, then stop now and use the earlier tutorial. If, on the other hand, the above points irk you to no end and you really wish you could do something about them, then here we go! Please remember, you can always change your mind later if you decide that the extra work isn't worth it ")
Step 1: Create a PacketDispatcher
 /**
 *
 * This class will house the SimpleNetworkWrapper instance, which I will name 'dispatcher',
 * as well as give us a logical place from which to register our packets. These two things
 * could be done anywhere, however, even in your Main class, but I will be adding other
 * functionality (see below) that gives this class a bit more utility.
 *
 * While unnecessary, I'm going to turn this class into a 'wrapper' for SimpleNetworkWrapper
 * so that instead of writing "PacketDispatcher.dispatcher.{method}" I can simply write
 * "PacketDispatcher.{method}" All this does is make it quicker to type and slightly shorter;
 * if you do not care about that, then make the 'dispatcher' field public instead of private,
 * or, if you do not want to add a new class just for one field and one static method that
 * you could put anywhere, feel free to put them wherever.
 *
 * For further convenience, I have also added two extra sendToAllAround methods: one which
 * takes an EntityPlayer and one which takes coordinates.
 *
 */
public class PacketDispatcher
{
 // a simple counter will allow us to get rid of 'magic' numbers used during packet registration
 private static byte packetId = 0;

 /**
 * The SimpleNetworkWrapper instance is used both to register and send packets.
 * Since I will be adding wrapper methods, this field is private, but you should
 * make it public if you plan on using it directly.
 */
 private static final SimpleNetworkWrapper dispatcher = NetworkRegistry.INSTANCE.newSimpleChannel(TutorialMain.MOD_ID);

 /**
 * Call this during pre-init or loading and register all of your packets (messages) here
 */
 public static final void registerPackets() {
 // Using an incrementing field instead of hard-coded numerals, I don't need to think
 // about what number comes next or if I missed on should I ever rearrange the order
 // of registration (for instance, if you wanted to alphabetize them... yeah...)
 // It's even easier if you create a convenient 'registerMessage' method:
 PacketDispatcher.registerMessage(OpenGuiMessage.OpenGuiMessageHandler.class, OpenGuiMessage.class, Side.SERVER);
 PacketDispatcher.registerMessage(SyncPlayerPropsMessage.SyncPlayerPropsMessageHandler.class, SyncPlayerPropsMessage.class, Side.CLIENT);

 // If you don't want to make a 'registerMessage' method, you can do it directly:
 //PacketDispatcher.dispatcher.registerMessage(OpenGuiMessage.OpenGuiMessageHandler.class, OpenGuiMessage.class, packetId++, Side.SERVER);
 //PacketDispatcher.dispatcher.registerMessage(SyncPlayerPropsMessage.SyncPlayerPropsMessageHandler.class, SyncPlayerPropsMessage.class, packetId++, Side.CLIENT);
 }

 /**
 * Registers a message and message handler
 */
 private static final void registerMessage(Class handlerClass, Class messageClass, Side side) {
 PacketDispatcher.dispatcher.registerMessage(handlerClass, messageClass, packetId++, side);
 }

 //========================================================//
 // The following methods are the 'wrapper' methods; again,
 // this just makes sending a message slightly more compact
 // and is purely a matter of stylistic preference
 //========================================================//

 /**
 * Send this message to the specified player.
 * See {@link SimpleNetworkWrapper#sendTo(IMessage, EntityPlayerMP)}
 */
 public static final void sendTo(IMessage message, EntityPlayerMP player) {
 PacketDispatcher.dispatcher.sendTo(message, player);
 }

 /**
 * Send this message to everyone within a certain range of a point.
 * See {@link SimpleNetworkWrapper#sendToDimension(IMessage, NetworkRegistry.TargetPoint)}
 */
 public static final void sendToAllAround(IMessage message, NetworkRegistry.TargetPoint point) {
 PacketDispatcher.dispatcher.sendToAllAround(message, point);
 }

 /**
 * Sends a message to everyone within a certain range of the coordinates in the same dimension.
 */
 public static final void sendToAllAround(IMessage message, int dimension, double x, double y, double z,

double range) {
 PacketDispatcher.sendToAllAround(message, new NetworkRegistry.TargetPoint(dimension, x, y, z,

range));
 }

 /**
 * Sends a message to everyone within a certain range of the player provided.
 */
 public static final void sendToAllAround(IMessage message, EntityPlayer player, double range) {
 PacketDispatcher.sendToAllAround(message, player.worldObj.provider.dimensionId, player.posX,

player.posY, player.posZ, range);
 }

 /**
 * Send this message to everyone within the supplied dimension.
 * See {@link SimpleNetworkWrapper#sendToDimension(IMessage, int)}
 */
 public static final void sendToDimension(IMessage message, int dimensionId) {
 PacketDispatcher.dispatcher.sendToDimension(message, dimensionId);
 }

 /**
 * Send this message to the server.
 * See {@link SimpleNetworkWrapper#sendToServer(IMessage)}
 */
 public static final void sendToServer(IMessage message) {
 PacketDispatcher.dispatcher.sendToServer(message);
 }
}
Step 2: Create an AbstractMessage class
 // the base class:
public abstract class AbstractMessageHandler<T extends IMessage> implements IMessageHandler <T, IMessage>
// class for messages sent to and handled on the client:
public abstract class AbstractClientMessageHandler<T extends IMessage> extends AbstractMessageHandler<T>
// class for messages sent to and handled on the server:
public abstract class AbstractServerMessageHandler<T extends IMessage> extends AbstractMessageHandler<T>
 /**
 *
 * Syntax for extending this class is "public class YourMessageHandler extends AbstractMessageHandler"
 *
 * I prefer to have an EntityPlayer readily available when handling packets, as well as to
 * know which side I'm on without having to check every time, so I handle those operations
 * here and pass off the rest of the work to abstract methods to be handled in each sub-class.
 *
 * We do not want to have to implement client handling for server side messages (and vice-versa),
 * however, so we will abstractify even further, as well as create separate packages to organize
 * our client vs. server messages. If you only have a few packets, you may opt not to, but once
 * you have more than a handful, keeping them separate makes it easier to remember on which side
 * to register, which side you can send to, and so on.
 *
 */
public abstract class AbstractMessageHandler<T extends IMessage> implements IMessageHandler <T, IMessage>
{
 // In your server proxy (mine is named CommonProxy):
/**
 * Returns a side-appropriate EntityPlayer for use during message handling
 */
public EntityPlayer getPlayerEntity(MessageContext ctx) {
 return ctx.getServerHandler().playerEntity;
}

// In your client proxy:
@Override
public EntityPlayer getPlayerEntity(MessageContext ctx) {
 // Note that if you simply return 'Minecraft.getMinecraft().thePlayer',
 // your packets will not work because you will be getting a client
 // player even when you are on the server! Sounds absurd, but it's true.

 // Solution is to double-check side before returning the player:
 return (ctx.side.isClient() ? Minecraft.getMinecraft().thePlayer : super.getPlayerEntity(ctx));
}/** * * This is just a convenience class that will prevent the server-side message handling * method from appearing in our client message handler classes. * */ public abstract class AbstractClientMessageHandler<T extends IMessage> extends AbstractMessageHandler<T>
 /**
 *
 * This is just a convenience class that will prevent the client-side message handling
 * method from appearing in our server message handler classes.
 *
 */
public abstract class AbstractServerMessageHandler<T extends IMessage> extends AbstractMessageHandler<T>
 private static final void registerMessage(Class<? extends IMessageHandler<REQ, REPLY>> handlerClass, Class<REQ>  messageClass) {
 Side side = AbstractClientMessageHandler.class.isAssignableFrom(handlerClass) ? Side.CLIENT : Side.SERVER;
 PacketDispatcher.dispatcher.registerMessage(handlerClass, messageClass, packetId++, side);
}Step 3: Real Examples
 // I send this packet whenever the player joins the world, specifically from ExtendedPlayer#loadProxyData:
PacketDispatcher.sendTo(new SyncPlayerPropsMessage(player), (EntityPlayerMP) player);

/**
 *
 * A packet to send ALL data stored in your extended properties to the client.
 * This is handy if you only need to send your data once per game session or
 * all of your data needs to be synchronized together; it's also handy while
 * first starting, since you only need one packet for everything - however,
 * you should NOT use such a packet in your final product!!!
 *
 * Each packet should handle one thing and one thing only, in order to minimize
 * network traffic as much as possible. There is no point sending 20+ fields'
 * worth of data when you just need the current mana amount; conversely, it's
 * foolish to send 20 packets for all the data when the player first loads, when
 * you could send it all in one single packet.
 *
 * TL;DR - make separate packets for each piece of data, and one big packet for
 * those times when you need to send everything.
 *
 */
public class SyncPlayerPropsMessage implements IMessage
// remember - the IMessageHandler will be implemented as a static inner class
{
 // Previously, we've been writing each field in our properties one at a time,
 // but that is really annoying, and we've already done it in the save and load
 // NBT methods anyway, so here's a slick way to efficiently send all of your
 // extended data, and no matter how much you add or remove, you'll never have
 // to change the packet / synchronization of your data.

 // this will store our ExtendedPlayer data, allowing us to easily read and write
 private NBTTagCompound data;

 // The basic, no-argument constructor MUST be included to use the new automated handling
 public SyncPlayerPropsMessage() {}

 // We need to initialize our data, so provide a suitable constructor:
 public SyncPlayerPropsMessage(EntityPlayer player) {
 // create a new tag compound
 data = new NBTTagCompound();
 // and save our player's data into it
 ExtendedPlayer.get(player).saveNBTData(data);
 }

 @Override
 public void fromBytes(ByteBuf buffer) {
 // luckily, ByteBufUtils provides an easy way to read the NBT
 data = ByteBufUtils.readTag(buffer);
 }

 @Override
 public void toBytes(ByteBuf buffer) {
 // ByteBufUtils provides a convenient method for writing the compound
 ByteBufUtils.writeTag(buffer, data);
 }

/**
 * Remember: this class MUST be static or you will crash
 *
 * Don't forget to add as well - it is required
 */
public static class Handler extends AbstractClientMessageHandler<SyncPlayerPropsMessage> {
 // the fruits of our labor: we immediately know from the method name that we are handling
 // a message on the client side, and we have our EntityPlayer right there ready for use. Awesome.
 @Override
 public IMessage handleClientMessage(EntityPlayer player, SyncPlayerPropsMessage message, MessageContext ctx) {
 // now we can just load the NBTTagCompound data directly; one and done, folks
 ExtendedPlayer.get(player).loadNBTData(message.data);
 return null;
 }

 // Note here that we don't (and can't) implement the handleServerMessage method
 // since we extended AbstractClientMessage. This is exactly what we want.
 }
} // sent using the following code from KeyInputEvent:
PacketDispatcher.sendToServer(new OpenGuiMessage(TutorialMain.GUI_CUSTOM_INV));
/**
* If you are going with the more simple route, the only difference is your inner handler class signature
* will look like this:
*
* public static class Handler implements IMessageHandler<OpenGuiMessage, IMessage>
*
* and the only method will be:
*
* public IMessage onMessage(OpenGuiMessage, MessageContext)
*
* Note that you can't immediately tell what side you are supposed to be on just from looking at the method,
* and you have to do some work to get the player if you want it. But we fixed all that xD
*/
public class OpenGuiMessage implements IMessage {
// this will store the id of the gui to open
private int id;
// The basic, no-argument constructor MUST be included to use the new automated handling
public OpenGuiMessage() {}
// if there are any class fields, be sure to provide a constructor that allows
// for them to be initialized, and use that constructor when sending the packet
public OpenGuiMessage(int id) {
this.id = id;
}
@Override
public void fromBytes(ByteBuf buffer) {
// basic Input/Output operations, very much like DataInputStream
id = buffer.readInt();
}
@Override
public void toBytes(ByteBuf buffer) {
// basic Input/Output operations, very much like DataOutputStream
buffer.writeInt(id);
}
public static class Handler extends AbstractServerMessageHandler<OpenGuiMessage> {
@Override
public IMessage handleServerMessage(EntityPlayer player, OpenGuiMessage message,
MessageContext ctx) {
// because we sent the gui's id with the packet, we can handle all cases with one line:
player.openGui(TutorialMain.instance, message.id, player.worldObj, (int) player.posX, (int) player.posY, (int) player.posZ);
return null;
}
}
}Bi-Directional Packets
 /**
 * For messages which can be sent to either Side
 */
public abstract class AbstractBiMessageHandler<T extends IMessage> extends AbstractMessageHandler<T> {

}
Yep, that's it, empty... why would we do that? This lets us implement BOTH our onMessage handlers, but more importantly, gives us a way to distinguish packets during registration: /**
* Registers a message and message handler on both sides
* @param handlerClass Must extend {@link AbstractBiMessageHandler}
* @param messageClass must implement {@link IMessage}
*/
private static final void registerBiMessage(Class handlerClass, Class messageClass) {
if (AbstractBiMessageHandler.class.isAssignableFrom(handlerClass)) {
PacketDispatcher.dispatcher.registerMessage(handlerClass, messageClass, packetId, Side.CLIENT);
PacketDispatcher.dispatcher.registerMessage(handlerClass, messageClass, packetId++, Side.SERVER);
} else {
throw new IllegalArgumentException("Cannot register " + handlerClass.getName() + " on both sides - must extend AbstractBiMessageHandler!");
}
} Then we create and register a bidirectional packet: registerBiMessage(PlaySoundPacket.Handler.class, PlaySoundPacket.class);
// Sound packet handler code:
public static class Handler extends AbstractBiMessageHandler<PlaySoundPacket> {
@Override
public IMessage handleClientMessage(EntityPlayer player, PlaySoundPacket message, MessageContext ctx) {
// This will play a sound that only the client player will hear:
player.playSound(message.sound, message.volume, message.pitch);
return null;
}
@Override
public IMessage handleServerMessage(EntityPlayer player, PlaySoundPacket message, MessageContext ctx) {
// This will play a sound that everyone nearby will hear:
player.worldObj.playSoundEffect(message.x, message.y, message.z, message.sound, message.volume, message.pitch);
return null;
}
}Setting up the Server
Well, I hope you enjoyed that little exercise as much as I did, and hopefully this helped you customize the packet handling experience to your liking. Again, I feel the need to stress that the solutions presented in this tutorial are wholly unnecessary for a functioning packet handling system, so please do not think that it has to be done this way.
FOOTNOTE
Now that you've gone through all of that, you may be thinking, as I did, that it seems really stupid to have to write a static IMessageHandler class for every single IMessage. I mean, can't it be generalized somehow? ABSOLUTELY!
Now, there are some who prefer to keep the message handler completely separate from the message class, since they are technically two different things. That's fine. However, my opinion is that the message should be completely self-contained as much as possible so that when you add a new message, you write one single class that does everything it needs to do to accomplish what it's supposed to do, and that includes handling itself when it is received on the other side. It makes the code simple and easy to understand, and you'll never have to write another stupid IMessageHandler class again! Sweet.
A few notes about this method of self-contained messages:
1. You should still choose to extend either the Server or Client message class in most cases
2. You won't ever need to check Side again (unless implementing a bidirectional message, which is very rare)
3. You CAN use 'this' in your message class when processing itself, because the way the system is set up the message instance that is constructed on the receiving side calls the processing method after reading in its data. I personally find this more intuitive than writing 'msg.whatever' in an external handling class.
Finally, again, let me reiterate the fact that NONE OF THE ABOVE is necessary. At all. You can have a perfectly functioning network system without doing any of it. In fact, I recommend you try the 'normal' way first, as only then will you truly appreciate how awesome this tutorial is. Er, I mean, as only then will you be able to determine for yourself which way you prefer... Happy modding!
MY TUTORIALS
Need help with modding? Check out my tutorials on Github, or read them on the forums:
Custom Armors, the OOP Way (GitHub only)
1.7.2 Example Mod (GitHub only)
Modding With APIs
EventHandler and IExtendedEntityProperties
Custom Inventories in Items and Players
Multi-Input/Output Furnace
Custom Projectile: Getting it to Render
Overriding shift-click in custom Containers
Using Potions in Crafting Recipes
Enchanted Books and Crafting Recipes

1

1

8
import net.minecraftforge.common.BiomeDictionary; //Alternatively: import net.minecraftforge.common.*;
import static net.minecraftforge.common.BiomeDictionary.Type;
BiomeGenBase theBiome = new BiomeGenSpecial(theBiomeID);
GameRegistry.addBiome(theBiome);
BiomeDictionary.registerBiomeType(theBiome, Type.MOUNTAIN, Type.WASTELAND);
public enum Type
{
	 FOREST,
	 PLAINS,
	 MOUNTAIN,
	 HILLS,
	 SWAMP,
	 WATER,
	 DESERT,
	 FROZEN,
	 JUNGLE,
	 WASTELAND,
	 BEACH,
	 NETHER,
	 END,
	 MUSHROOM,
	 MAGICAL;
}@Override
public void generate(Random random, int chunkX, int chunkZ, World world,
IChunkProvider chunkGenerator, IChunkProvider chunkProvider)
{
//World generation code
}int x = chunkX * 16; int z = chunkZ * 16;
BiomeGenBase biome = world.getWorldChunkManager().getBiomeGenAt(x, z);
if(BiomeDictionary.isBiomeOfType(biome, Type.FOREST))
{
//World generation code
}@Override
public void generate(Random random, int chunkX, int chunkZ, World world,
IChunkProvider chunkGenerator, IChunkProvider chunkProvider)
{
int x = chunkX * 16;
int z = chunkZ * 16;
BiomeGenBase biome = world.getWorldChunkManager().getBiomeGenAt(x, z);
if(BiomeDictionary.isBiomeOfType(biome, Type.FOREST))
{
    //World generation code
}
}BiomeDictionary.registerAllBiomes();
BiomeGenBase[] biomes = BiomeDictionary.getBiomesForType(Type.FROZEN);
SpawnListEntry ocelotSpawn = new SpawnListEntry(EntityOcelot.class, 2, 1, 1);

for(int i = 0; i < biomes.length; i++)
{
    biomes[i].getSpawnableList(EnumCreatureType.monster).add(ocelotSpawn);
}SpawnListEntry ocelotSpawn = new SpawnListEntry(EntityOcelot.class, 2, 1, 1);
for(int i = 0; i < biomes.length; i++)
{
if(BiomeDictionary.isBiomeOfType(biomes[i], Type.FOREST))
{
biomes[i].getSpawnableList(EnumCreatureType.monster).add(ocelotSpawn);
}
}
1
Hey man, looks cool! Keep it up!
1
Hey, I saw your post on the Forge forums and followed the link here. This mod sounds really cool. I've been building a realistic survival mod and would love to have more realistic biome generation but don't feel like a strong enough programmer to take it on. It would be awesome to be able to integrate, or at least refer my (potential future) users to a mod like this.
2
Thanks for the reply. I don't know Java, but I recently read a tutorial on changing mob AI using Forge, and successfully created my own little mod that makes passive mobs flee the player. It definitely adds a new challenge to the game!